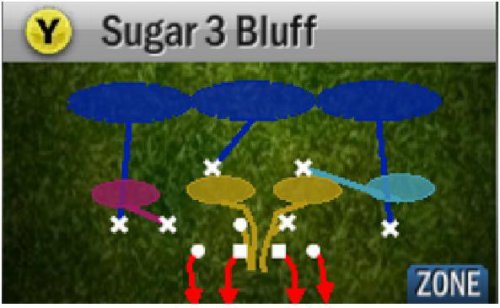
To recap the way we have set up the Curls play from Ace Y-Trips, here is the read:

As you are coming to the line:
- Watch how many safeties remain up high. Locate where they are - one in the middle of the hashes. Two high splitting the field in half?
- If you see only one safety up high, is the defense crowding the line of scrimmage on either the weakside or strongside of the field? A big mass of bodies creeping up to the line can indicate extra rushers are coming.
- You should also be able to observe the cornerbacks that line up on your wide receivers. They can be backed off seven yards or so from the line of scrimmage or rolled up directly in the face of your receivers on the line of scrimmage.
- Finally, on the approach you should look at your slot receiver to see if he is covered or not by a man lined up directly in front of him.
Now you can read the formation:
- Single high safety in the middle of the field with a bunch crowding the line should be read as Man coverage behind a blitz. You should be watching the high safety and looking for the coverage rotation at the snap to know which curl will be open (whichever the rotation is away from).
- Single high safety in the middle of the field with nobody showing blitz should be read as likely Cover 3. You should be watching the high safety and looking for the coverage to rotate from strong to weak, and the strongside curl ought to be open. There is a good chance the TE arrow will be open as well if there is an unexpected dropper under the strong curl. If this is disguised Cover 2, you are still okay because the distance for the defenders to shift to Cover 2 positions is usually far enough to take them out of position to stop the curl; also, you are already looking in the right direction to notice if the slot post is open (like a West Coast triangle read).
- Double high safeties dividing the field with corners backed off a lot should be read as likely Cover 4. The key here is to see that the strongside cornerback is actually further back from the line than the nearest linebacker. You will be looking for the defense to all backpedal with nobody covering the TE arrow, which will be your first read. Even if the coverage is actually a disguised man scheme, you should be able to complete the pass safely for a small gain of 1-3 yards.
- Double high safeties dividing the field with corners all the way up on the line should be read as Cover 2 of some kind. Either zone or man underneath with a two shell over the top. No matter which type of coverage is under the two shell, the most likely option to throw is the slot post, who needs to win against man coverage or bend behind a zone defender. If this is disguised Cover 3, you are still okay because you are already looking in the right direction to notice if the curl is open instead (like a West Coast triangle read). If you do not have a slot advantage, check to a run or some Cover 2 beater.
At the snap:
- If you saw an uncovered slot man, check if you think he will be open for a quick vertical strike in the middle for 20 yards.
- If you had single high pre-snap, look at rotation for an 11 yard curl throw on the appropriate side.
- If you had two high pre-snap with corners back, make sure the TE arrow is not jumped and bullet it.
- If you had two high pre-snap with corners at the line, watch your slot post matchup and time the throw to get there after he has a step or two leading the nearest cover man.
Example: NCAA 14

Drive 1, Play 1: Curls vs Loop Crash 2

Extra keys: Bunched defenders crowding the line at left, uncovered slot on right.
Plan: Expect blitz, look at the slot post.
Result: We get the blitz and we get a two deep, four under zone that the slot post easily beats in the deep middle.
Drive 1, Play 2: Curls vs 2 Man Under

Pre-snap Read: Two high safeties, corners up = some kind of Cover 2 probably.
Extra keys: Slot covered.
Plan: Six on six in the box, Cover 2 = check to run.
Result: Cover 2 as expected, we get a decent run.
Drive 1, Play 3: Curls vs Cover 2 Sink

Pre-snap Read: Two high safeties, corners up = some kind of Cover 2 probably.
Extra keys: Slot covered.
Plan: Six on six in the box, Cover 2 = check to run.
Result: Cover 2 as expected, but we get stuffed.
Drive 1, Play 4: Curls vs Cover 3

Pre-snap Read: One high safety, cheating a bit to the left = Probably Cover 3.
Extra keys: Slot covered.
Plan: Watch high safety and expect to throw strongside curl.
Result: Cover 3, so easy first down to strongside curl.
Drive 1, Play 5: Curls vs Cover 3
Pre-snap Read: One high safety, centered on ball = Probably Cover 3, possibly Man.
Extra keys: Slot covered.
Plan: Watch high safety for rotation. Expect to throw strongside, but be ready to go weak.
Result: Cover 3 rotation toward weak, so easy first down throwing away from it to the strongside curl.
Drive 1, Play 6: Curls vs 2 Man Under
Pre-snap Read: Two high safeties, corners up = some kind of Cover 2 probably.
Extra keys: Slot covered.
Plan: Six on six in the box, Cover 2 = check to run.
Result: Cover 2 as expected, we get it down near the goal line.
Drive 1, Play 7: HB Plunge
We punch it in. No problem.
Drive 2, Play 1: Curls vs 3 Overload Fire

Pre-snap Read: Two high safeties, corners back = Cover 4 probably.
Extra keys: Slot will occupy the LB inside of him. No flat defender.
Plan: Snap and fire to TE.
Result: Turns out to be a blitz from the left side with a 3 shell; this still leaves the flat undefended.
Drive 2, Play 2: Curls vs Cover 2 Blitz

Pre-snap Read: Two high safeties, corners up = Cover 2 of some kind.
Extra keys: Suspicious bunching on left side with huge open spot where the post is going.
Plan: Take the slot post matchup vs the LB in front of him and see if we can win it with all that space.
Result: Turns out to be a blitz from the left side with a 2 shell. That leaves only three underneath defenders and the guy over the slot runs away from him to cover a middle zone. Our slot post goes completely uncovered up the seam for a wide open completion.
Drive 2, Play 3: Curls vs Over Storm Brave 3
Pre-snap Read: Two high safeties, corners back = Cover 4 probably.
Extra keys: Slot will occupy the LB inside of him. No flat defender.
Plan: Snap and fire to TE.
Result: Turns out to be a middle blitz with a 3 shell; this still leaves the flat undefended, but you can see the slot post was also undefended. I could have hit that for a longer gain, but the TE is the safer throw to get the ball out fast.
Drive 2, Play 4: Curls vs Under Smoke

Pre-snap Read: One high safety, centered on ball = Probably Cover 3, possibly Man.
Extra keys: Slot covered.
Plan: Watch high safety for rotation. Expect to throw strongside, but be ready to go weak.
Result: High safety breaks right with nobody leaking under the weakside curl, so we know it is completely isolated in man coverage. Another easy first down throw to the weak curl.
Drive 2, Play 5: HB Stretch
All this is here for is to run wide to re-center the ball.
Drive 2, Play 6: Curls vs 2 Man Under
Pre-snap Read: Two high safeties, corners up = some kind of Cover 2 probably.
Extra keys: Slot covered.
Plan: Not sure why, but I decided to try the matchup. Probably thought I had them fatigued from two long drives.
Result: Cover 2 as expected, and we get man coverage (you can tell because the defender turns and runs with the slot receiver instead of backpedaling into a zone). With no bump, my best receiver in the slot is running full speed against their nickel back. This is a one on one slot post win.
Drive 2, Play 7: Curls vs SS Snake 3 Stay

Pre-snap Read: Two high safeties, but Strong Safety walks up = some kind of weird blitz.
Extra keys: Slot uncovered with no deep help behind the slot.
Plan: We're going to have three (TE, Curl, Slot Post) on two (Nickel and Curl CB), so something is going to be open. Read slot post to TE arrow. One of them should be open because there's no way the cornerback will let the Curl receiver run past him into an area with nobody behind him.
Result: The nickel back goes wide to protect against the TE in the flat. The slot is actually being accounted for by the FS on the other side of the formation assigned the middle deep zone, who has no hope in getting over. The blitz leaves too few underneath defenders, so the nearest underneath zone guy (the linebacker in the middle) is too far to matter too.
Drive 3, Play 1: Curls vs Cover 4
Pre-snap Read: Two high safeties, corners back = Cover 4 probably.
Extra keys: Slot will occupy the LB inside of him. No flat defender.
Plan: Snap and fire to TE.
Result: Cover 4 as expected, so we get some safe breathing room and re-center the ball.
Drive 3, Play 2: Curls vs Cover 2 Disguise
Pre-snap Read: One high safety, centered on ball = Probably Cover 3, possibly Man.
Extra keys: Slot covered with the safety stacked behind the slot cover man, so this is weird.
Plan: Watch high safety for rotation. Expect to throw strongside, but be ready to go weak.
Result: The stacked safety is the tipoff that something is off here. The defense still rotates weak, and the curl breaks in front of the nearest defender, but look how wide open the TE was. Had the curl been taken away, I could have dumped the ball to the TE and probably still got the first down. Since I was already looking to that area, it would not be a difficult switch.
Drive 3, Play 3: Curls vs 2 Man Under
Pre-snap Read: Two high safeties, corners up = some kind of Cover 2 probably.
Extra keys: Slot covered.
Plan: Six on six in the box, Cover 2 = check to run.
Result: Cover 2 as expected, we don't get much but that's okay because it's only first down.
Drive 3, Play 4: Curls vs 2 Man Under
Pre-snap Read: Two high safeties, corners up = some kind of Cover 2 probably.
Extra keys: Slot covered.
Plan: Six on six in the box, Cover 2 = check to run.
Result: Cover 2 as expected, but this time the offensive line wins and opens up a huge hole up the gut.
Drive 3, Play 5: Curls vs Cover 6
Pre-snap Read: Two high safeties, corners up = some kind of Cover 2 probably.
Extra keys: Slot covered.
Plan: Six on six in the box, Cover 2 = check to run.
Result: Turns out to be Cover 6 and we don't get much but that's okay since it's first down.
Pre-snap Read: Two high safeties, corners up = some kind of Cover 2 probably.
Extra keys: Slot covered.
Plan: Six on six in the box, Cover 2 = check to run.
Result: Cover 2 as expected and we don't get much. Notice how much 2 Man Under is being called now.
Drive 3, Play 7 Curls vs SS Mike Blitz 3

Pre-snap Read: Two high safeties, but Free Safety walks up = some kind of weird blitz.
Extra keys: Slot covered with remaining high safety strongside over slot.
Plan: Looks like a weakside blitz with the remaining high safety far away from our isolated weakside curl. If the "blitzers" back out and drop underneath the weakside curl, the strongside looks like what we get in Cover 4, so the TE should be open if this is a disguised full zone.
Result: With nobody nearby, the deep zone cornerback weakside may as well be in man coverage. The curl is open so we throw it, but look at the TE. That was open in case we needed it.
Drive 3, Play 8: HB Stretch
All this is here for is to run wide to re-center the ball.
Drive 3, Play 9: Curls vs Over Storm Brave 2
Pre-snap Read: Two high safeties, corners back = Cover 4 probably.
Extra keys: Slot will occupy the LB inside of him. No flat defender.
Plan: Snap and fire to TE.
Result: Blitzing some of the underneath defenders leaves too few to cover everything, and the TE is open anyway. It has the same effect as dropping extra guys into deep zones - either way you have fewer players to cover short routes.
Drive 3, Play 10: Curls vs 2 Man Under
Pre-snap Read: Two high safeties, corners up = some kind of Cover 2 probably.
Extra keys: Slot covered.
Plan: Six on six in the box, Cover 2 = check to run.
Result: Defense is probably getting tired. We get a decent run to set up a good second down.
Drive 3, Play 11: Curls vs Cover 2 Disguise
Pre-snap Read: One high safety, cheating left a little = Probably Cover 3, possibly Man.
Extra keys: Slot covered with the safety stacked behind the slot cover man, which is the same weird thing we saw earlier when they went to Cover 2 Disguise. The SS has to align there to be in position to drop back into his deep half zone.
Plan: Watch high safety for rotation. Expect to throw strongside, but be ready to go weak.
Result: Sure enough, the same Cover 2 Disguise rotation happens. The reason our strongside curl still works is that the slot receiver is coming right up the seam in front of the Strong Safety while the underneath zone defenders are rotating away from the slot man's vertical stem. The SS has to stay inside in case the slot guy keeps going deep because nobody else is in position to pick him up. That keeps the SS out of position for the curl, and the cornerback is forced to stay deeper than our strongside curl WR since his over the top help isn't in the right place.
Drive 3, Play 12: Curls vs 2 Man Under
Pre-snap Read: Two high safeties, corners up = some kind of Cover 2 probably.
Extra keys: Slot covered.
Plan: Six on six in the box, Cover 2 = check to run.
Result: Good run against light personnel; the defense is not only going to Cover 2 Man, but only brought three down linemen. They are completely committing to take away the pass now.
Drive 3, Play 13: Curls vs 3 Strong Cloud
Pre-snap Read: Two high safeties, corners up = some kind of Cover 2 probably.
Extra keys: Slot covered.
Plan: Six on six in the box, Cover 2 = check to run.
Result: Okay run sets up third and short.
Drive 3, Play 14: HB Plunge vs Under Smoke
We pound the ball for the first down and more. Pretty sure the only reason I get so much yardage here is because this is a ridiculously long drive and the defense is tired.
Drive 3, Play 15: Curls vs Cover 2
Pre-snap Read: Two high safeties, corners up = some kind of Cover 2 probably.
Extra keys: Slot covered.
Plan: Six on six in the box, Cover 2 = check to run.
Result: Cover 2 is good against outside runs because the corners stay near the line of scrimmage and can be edge defenders against the run. We're staying strictly inside, though, so they don't really help.
Drive 3, Play 16: HB Plunge vs Blitz C
Now the defense switches to goal line defense, but i'm still able to get positive yards. At this point I noticed I still had my depth chart set to have my backup running back on formation substitutions and was running this whole time without my best HB.
Drive 3, Play 17: HB Plunge vs Blitz A
4th and Goal, it's in for a touchdown. 21-0 to start the BCS National Championship game against a more talented team using basically two plays (Curls and HB plunge, with unproductive HB Stretch to help center the ball) and nothing else.
Example: Madden 25
Drive 1, Play 1

The defense is doing something like this:

Calvin Johnson has nobody over him in the slot, so that's where we want to go. The issue is if the offensive line can pick up the blitz. What is amazing about this play is that the Right Tackle pulls over and does something like a ridiculously long distance molly block on the stunting blitzer. Stafford probably should have been sacked here since the running back did not pick up the blitz, but instead the pass goes for a long gain with a bender throw between the large underneath zones.
Drive 1, Play 2
On the second play, Minnesota comes out showing a Double A gap blitz but backs out. The coverage is similar to this, except the defensive backs are rotated strongside so the one playing the light blue zone is over the slot receiver:
Here's what we actually see in the play:

What appears to be happening is the defender logic is more sophisticated in Madden (like the RT finding someone to block above), so the defenders stay with the nearest receivers in their zones at first and then retreat back after their zone is cleared. That's why the guy in front of the TE initially starts to the flat with the TE but then lets him go and retreats to the right middle underneath zone.
It's also why the defensive back playing over the slot runs with Johnson at first and only breaks late to cover the outside curl receiver; he's overloaded with two routes running through his zone. This works the same as what we are doing in NCAA with the vertical stem of the slot post: it prevents the underneath zone defender from sitting under the strongside curl so we can hit it against Cover 3.
Drive 1, Play 3
This is the familiar single high read with a blitzer coming off the edge weakside. Man coverage behind it and no rotation to put someone under the curl makes the weakside curl an automatic throw.
Drive 1, Play 4
This is the same single high coverage rotation read. This time the coverage rotates toward the weakside, so we throw away from the rotation to the strongside curl.
Drive 1, Play 5
The defense comes out with two high safeties and backed off corners. The same Cover 4 throw to the TE in the flat is wide open for a short but safe gain.
Drive 1, Play 6
Single high and no rotation underneath, but the coverage is good and the weakside curl is dropped. The coverage over the slot defender was very good, and took away the slot post vertical stem but broke to the strongside curl and took that away too. The best open route to hit would have been the post at the end, but the disguise would have made that hard to spot.
Drive 1, Play 7
Single high with a vanilla balanced defense - another coverage rotation read. It's Cover 3 and the strongside curl is open as expected.
Drive 1, Play 8
Curls aren't great for deliberately picking up short yardage. Curls really needs about 15 yards to work well. Stick is designed to get 5 yards, so it's a good call to make for this touchdown.
Drive 2
Three plays - basically the Cover 4 read to the TE (with a great block) and then two uncovered slot passes to Calvin Johnson. The first is against a zone blitz with the Chad Greenway dropping from a three point stance; it takes away the vertical stem but he has no hope of stopping Megatron's break to the post. The second is a corner roll that goes terribly wrong when nobody picks up either the strongside curl or the slot post.
Drive 3, Play 1
This is an excellent example of why - especially in Madden with more disguised coverages - you have to actually read the coverage rotation when throwing the curls. The defense comes out showing blitz on the weakside so heavily that it looks like a zero blitz. But at the snap of the ball, the guys crowding the line of scrimmage all bail and it is really some kind of Cover 3.

Blindly assuming man coverage behind a blitz would have resulted in a picked off throw to the weakside curl. Instead, both the strongside curl and the TE were wide open. Since the coverage was overloaded to the weakside, the strongside curl was one on one coverage with the deep zone cornerback.
Drive 3, Play 2
Here we get two high and corners up on the wideouts as well as the slot receiver. I'm thinking we look for the slot post, but it turns out to be a zone blitz. Certainly the slot post vertical stem was open, but look at the TE leaking out into the flat with nobody picking him up. Since we are looking at the slot matchup from the start, it's easy to see all of the edge defenders rushing and automatically we know the flat is undefended. Love the power at the end to get it into the end zone.
Drive 4, Play 1
This is the Cover 4 read to throw the TE route.
Drive 4, Play 2
Again we have an uncovered slot and the nearest man blitzes. This leaves nobody to pick up the slot vertical stem.
Drive 4, Play 3
Four across look, but the nearest man is not playing over the slot. This screams zone and is a good opportunity to throw the bender.
Drive 4, Play 4
In reality, no team will ever leave Johnson uncovered like this, but again the slot receiver doesn't have a man directly over him. The strongside corner is rolled up to the line of scrimmage while the weakside corner is backed off. It looks like what we get is Quarter-Quarter-Half (Cover 6) of some kind with the weakside playing the Cover 4-like defense and the strongside playing as if it's Cover 2. Megatron is up against Greenway in the underneath zone and the coverage just has no chance.
I don't know how much of this is the fact that Detroit has Stafford, Calvin Johnson, and a good offensive line and how much of this is the Vikings defense being awful, but this was all on All-Madden difficulty. Anyway, you can see how the ball gets distributed to lots of receivers depending on the read. How balanced can it get? Here's the final stats on the game I was using to get game film:

Now, of course you don't want to just run two or three plays for an entire game... but Matthew Stafford had a pretty good game doing just that.
