This is where the hitch at the front of the Smash combination comes into play. The cornerback opposite the frontside wide receiver in either a single or four high look will almost always be playing loose and line up pretty far back from the line of scrimmage. If the CB is all the way up in the WR's face, that will almost always be press man, and we're fine. The quick hitch takes advantage of the fact that nobody is near enough to the WR when he stops to make a difference, and we end up picking up five yards for no effort.
Cover 3
Consider the following alignment in NCAA with a Smash playcall against a single high safety:

First notice how far back the corner on the right is. The next cover man over the slot will be forced to drop with the slot receiver down the seam, and cannot take the hitch. Similarly, the inside zone defenders are forced to honor the TE streaking down the middle of the field, so they cannot take the hitch either. If it were coded better, I would think the defense ought to be adjusting to get the linebackers to rotate over, but instead NCAA and Madden do weird things like this:
The corners and slot defender drop into deep coverage and the free safety rotates over under the backside Dig. This leaves an extra man on the backside, so one of them must book it across the field to get to the uncovered far right zone. There is no way for him to make it over in time; our receiver is wide open and the throw is on the way before he even clears the tackle box.

Since this is not a blitz situation and the receiver is uncontested, this is an automatic completion with enough running room to get a few extra yards every time.
Cover 4
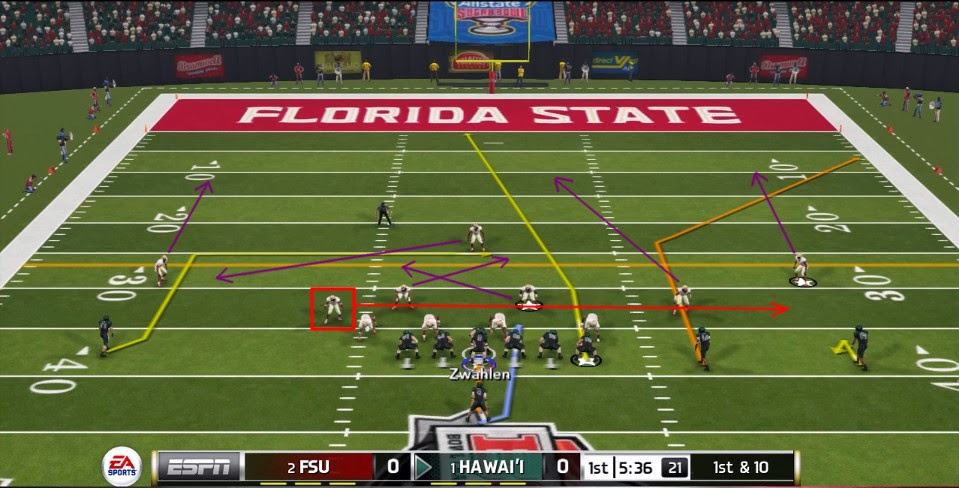
The very next play, Florida State lines up with two high safeties and corners back. Again, the important thing to see out of the alignment is the big cushion the hitch receiver starts out with:

The trips right overloading of the coverage scheme crosses up the underneath zone defenders in Cover 4 as well. The slot defender is forced to carry the slot corner route's stem a bit up the field, leaving the hitch uncovered. The linebacker nearest the TE does the same, and is forced to carry him up the field. This leaves only one defender on the wrong side of the formation to try and get over to cover the hitch, which is not going to happen.

As before against Cover 3, the hitch is wide open against Cover 4. Both defensive calls are strong against plays attacking deep, which necessarily leaves the coverage scheme vulnerable against a quick hitter.

Here are the two plays back to back:
Madden 25 Example
Although those clips above are from NCAA, this read to throw the Hitch works largely the same way in Madden. At about the 1:35 mark, there's an interesting decision I don't remember making. Instead of throwing the Dig against man coverage, I went to the Hitch to get a short first down. This is normally okay, but look how the cornerback charges the Hitch in man coverage. This can be a dangerous throw to make: if there is an All-Pro CB there, it can be a pick six going the other way.
As a general rule look at the linebackers when you suspect Cover 3 or 4 is likely, and read whether as a group they are indicating man (throw the Dig) or zone (throw the Hitch).