
This is where the Smash play comes in; this is a play that is specifically designed to hit alignments with deep safeties playing halves. The play is weak against Cover 3, but does very well against most Man coverages behind blitzes and is okay against Cover 4. Hitting Cover 2 for big yards forces the defense to call more Cover 3, which is exactly what we want to throw Curls against. Either way, we have a good chance of getting the coverage matchup we want and can simply audible to a run or Stick if we don't get what we want.
How the Smash Combo is Supposed to Work
The Smash route combination is the pairing you see on the far right of the play diagram. Here's Florida State's Jimbo Fisher on "the universal route that is good versus any coverage":
One of these routes is the smash route. The smash route is basically a two-man route. It consists of the outside offensive player running a 5-to 6-yard hitch route and the inside offensive player running an eight step or 12 yard smash route. We call this a smash route because the route, will be read at the break point.The idea is to get a vertical stretch on the defender in the underneath zone along the right edge of the formation. The quarterback will key the cornerback to determine where to go with the football. Based on the reaction of the cornerback the QB will know whether to throw the corner route (high) or the hitch route (low). If the underneath zone defender (usually the cornerback) takes away the hitch, he has to come up and play the WR very close to the line, taking him out of position to intercept against the corner route behind him:

When the defender plays the short route, "the goal is to hit in the window behind the corner but in front of the safety." If the zone defender plays back, he takes away that corner route, but is out of position to cover the hitch:

Why We Don't Make This Read
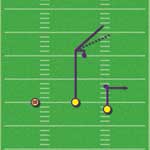
In NCAA 14, there are two main reasons not to read the Smash play this way to attack the trips side cornerback. The first is the camera angle in the game. If you are on the left hashmark, it is hard to see what is going on over there. Since this play is best run from the left side of the field, we have a problem:

The second reason to not read this play as a normal Smash combo is that the slot receiver running the corner does not break early enough or bend the route flat enough to be effective. In the picture above, you can see the stem of the slot man's corner route is actually very long, and extends all the way up into the alley between the deep zones and underneath zones. That is actually too late, and he needs to be able to flatten off the break to attack the hole along the sideline.
Consider the following Smash play:

Here the throw to the corner is wide open. The safety is playing far back and the cornerback is sitting shallow on top of the 5 yard hitch. This is exactly the Smash read to throw the corner in front of the safety. Instead of breaking to the open area for the QB to drop the ball in to him, the slot man runs too deep up the field and hardly breaks, running straight at the safety:
Players in NCAA Football will not make the kinds of adjustments a real player would make on the field. Go back to what Jimbo Fisher said about the Smash combo:
We call this a smash route because the route, will be read at the break point. (See Diagram 1)
The smash route is a versatile route good vs. all coverages. The inside receiver is the one who does the reading. Versus zone coverage, he reads the corners depth. There are other variables of the defense that can be read also, but by reading the corner, this is the simplest way and it eliminates complicating the procedure.Since our slot receiver running the corner on top of the Smash combo won't make this read correctly, it messes up the way the routes are supposed to work together. Fortunately, the play is still effective even if the vertical stretch is broken because there is a great horizontal stretch element.
Smash Divide
When reading two high safeties, the important routes are not the corner plus hitch: it is the corner plus the TE vertical down the seam. Our Smash play from Ace Y-Trips is really the Smash Divide play covered by Chris Brown at Smart Football:
The point of this article is to talk about adding a bit more of a big-play dimension to theSmash by using the "divide route," which in other coaches terminology may be a "seam read" or a "tube-read." Both the route and the "read" are simple.
The divide route involves a MOFO or MOFC read by the inside receiver. MOFO simply means "middle of the field open," or no deep middle safety. MOFC means "middle of the field closed," or is there a deep middle guy. The nice thing about this read for the "divide route" as opposed to some other contexts is that the route, hence the name, is simply about "dividing" the deep coverage and the receiver has a lot of freedom to find the downfield open grass. It's a deep stretch and it is designed to strike safeties who overplay the smash or simply get out of position.
Obviously the immediate strength of the divide route as shown is that if a two-deep safety to the smash side overplays the route, one can hit the post route for a big play. If you keep the go route on the backside (as diagrammed) and both safeties overplay the Smash side then the "Go" might be open for a big play. The simple reality is that a Cover 2 team really cannot cover this concept effectively.Now look at the diagram that he uses to accompany the article, showing the concept against Cover 2:

The trips side on the right is remarkably similar to the routes assigned to our Smash play from Ace Y-Trips:
In fact, it turns out the TE in our play is programmed to make that divide route read that Brown mentions. The TE runs down the Cover 3 seam and angles slightly away from the strong half safety into the middle of the field. The reason everything works here is that the weakside WR is threatening with a vertical stem, breaking in front of where the weak half safety is sitting, and he has to honor the possibility that we might get a deep play there.
So the weak half safety is pinned by the weak side dig route and the strong half safety is pinned by the slot corner route. This leaves the TE streaking down the middle with nobody to pick him up. He will be one on one with whoever is playing the middle underneath - typically a linebacker - who is counting on over the top help from a safety, and will pass the TE once he crosses over into the deep part of the field... except nobody will pick him up. This is what a Tampa 2 defense is supposed to be taking away:

Kiffin and Dungy schemed to drop their middle linebacker straight down the middle of the field ("the pipe") to take away the soft zone in the deep middle of the field and allow the safeties to get to the deep sideline more easily. They dropped their corners off the line of scrimmage more than the usual Cover-2 alignment. That allowed them to disguise coverage, roll defenders to protect zones during the rare blitz and keep blockers off the corners on rush downs.
To pull it off, they needed players with very specific skill sets. They needed explosive edge rushers who could get to the quarterback, run defense was secondary. They needed a special MLB who was stout enough to play the usual run support role but athletic enough to drop in coverage and make plays.
Most of the time, a defense will not have a MLB capable of covering the TE one on one with no help. In NCAA especially, the strong half safety will overcommit to taking away the corner (another reason we can't make the real Smash read), so you get the big play down the pipe very often. Instead of a vertical stretch against the strong side cornerback, we are now attacking the strong half deep safety horizontally.
Throwing the TE Divide
When the defense in a two high safety look, the place to watch is right in front of the TE. What we are trying to determine is if the defense is in zone or man coverage - just like when we were throwing the Stick. If the linebacker turns and runs with the TE down the field with his back to the quarterback, we know we have him in man coverage. If the linebacker does not turn around and instead backpedals, he is in zone.
Here is an example of the TE divide route against Cover 2 Sink and Cover 3 Cloud calls out of a two high shell. Notice the linebackers move backwards and laterally to get to their zone assignments. The quarterback has to start his delivery as the TE is running past the backpedaling underneath linebacker. This ensures the TE cannot be caught by the LB, who must now turn around to try and catch a guy running already blowing by at full speed.
On this play versus Cover 2, watch the strong deep half safety. He stays over the top of the corner route until the throw is on the way, leaving more space in the middle of the field for the TE to work:
The other possibility is the linebacker could be blitzing, in which case he is creating a hole in the coverage we can hit very quickly for an easy completion. Here is Cincinnati playing Cover 2 Blitz and Under Smoke 2 (twice). As long as the protection can pick up the blitz and give enough time to make the throw, hitting the TE in a coverage hole is very easy. On the first play you can really see the corner route holding the strong side safety away from the TE (and again we wait until he is running by the backpedaling LB) while on the second and third plays the underneath zone hole is obvious at the snap.
While you can sometimes throw the divide against man coverage, it is risky. The principle is similar in that the QB needs to wait for the TE to get separation into the deep middle of the field. The difference is that instead of running past a linebacker who needs to turn around, the quarterback is waiting for the TE to outrun the man defender and needs to drop it in from above.
The danger is that the route takes longer to develop since the linebacker is running with the TE and the throw itself takes longer. The higher arc of a ball coming in from above gives the safeties more time to react and get over to make a play; this is usually a bad throw to make against teams with very good safeties.
Throwing the Slot Corner
The difference between running this play in NCAA and in Madden is that in Madden the slot receiver will break his corner route much flatter than in NCAA. This makes it possible to consider throwing the slot corner against Cover 2 as designed.
The thing to focus on in both clips in the video above is how close to the sideline the slot receiver ends up. Unlike the slot corner route in NCAA, the Madden slot corner route gets run way to the outside; this gets the slot receiver out of the inner underneath zone faster because he's not just getting distance from the defender vertically but also horizontally. This is more obvious in the first of the two plays: the zone defender stops around the numbers at the edge of his assigned zone.
In NCAA, the only time the slot corner route is likely to be open is when the slot receiver is uncovered. This is like throwing the slot post in the Curls play - opportunity is not often there, but we have to be alert and watch for it.