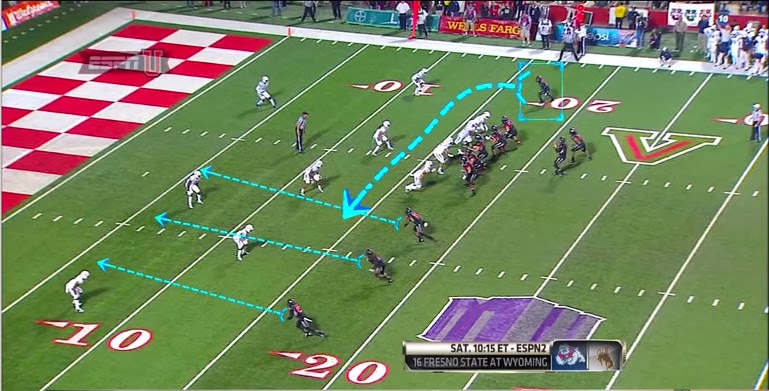
For the entire analysis of this play, the only active routes considered are the TE Post, the Slot WR Corner, and the SE WR Drag. The Flanker and HB are running essentially decoy routes that we never intend to throw. Like the Stick and Smash reads, the area to watch at the snap will generally be right in front of the Tight End to read man or zone coverage and to check if the middle of the field is vacated by blitzers.
Vertical Stem Clearouts
Three of the four routes push up the field on vertical stems, forcing any defenders in front of them to start retreating at the snap. This clears space underneath for the trailing Split End running a drag across the field. The verticals have this effect whether the coverage is man to man or zone, but the main benefit comes when the coverage is some kind of zone scheme. This is the "zone drop" that Tom Luginbill and Matt Millen talk about in this clip from ESPNU's Film Room on Fresno State's David Carr:
The retreating zone defenders carrying the vertical receiver leave an empty area underneath for the shallow crossing route to run into.
This concept can be found in spread offenses like Urban Meyer's version and is also used by teams at the pro level. For example, here is Denver running the same thing out of the shotgun against New England in the AFC Championship Game:
Demaryius Thomas, Julius Thomas, and Wes Welker (he gets wiped out in the middle of the field) all push vertically while Eric Decker comes from the top of the field behind them. Peyton Manning hits Decker in stride, who turns upfield for a first down:
Here's Phil Simms' diagram from the overhead angle on the broadcast replay:
Cover 2
First, consider standard Cover 2 from an alignment with two high safeties. At the snap, defenders drop into coverage, clogging the passing lanes to the corner and post routes. This allows the far left WR to come all the way across the formation in front of everyone for uncontested yards.
Watch the defense vacate the space right in front of the tackle box as the crosser passes in front of them:
Note the Tight End's post route is sometimes also open if he crosses the face of the dropping Middle Linebacker. That throw is not always there, but the drag is. The nice part about this is the read at the snap is on the linebackers right in front of the quarterback: if a combination of more than four rushers is coming, you know it's either a depleted zone scheme or man coverage. Even if we read the wrong thing at the snap and think man when the defense is really in zone, the checkdown route is coming across the field dead center in the middle of the screen, so it is very easy to come back to.
Cover 3
The same happens with the defense showing a single high safety dropping into Cover 3. The linebackers all backpedal at the snap with their eyes on the QB and any defenders near the corner or post routes clear out for the crosser to come underneath.
By the time the crosser enters the middle underneath zones, those linebackers have already backed up. When the outside zone defender passes the crosser to the middle zone defenders, they are out of position to jump the WR scorching by at full speed.
Note that this dump to the shallow crosser is equally effective against a defense playing disguised Cover 3 or Cover 6 out of a two high safety look. The deep zone trickery does not matter because the action underneath is the same. Watch the CB on the left side of the screen drop into a deep zone in the clip below:
Cover 4
Finally we come to Cover 4, which commits the most defenders deep and leaves less coverage underneath. Obviously, this is the easiest zone scheme to throw the shallow cross against.
The main takeaway to all of the above is that as long as you read non-blitz zone coverage, the WR drag coming across the field is always open for 5 to 10 yards. Always.


