Monday, February 24, 2014

Why is my team so bad in real life?

This post is a quick reminder (mostly to myself) that video game football is nowhere near the complexity of real football.  If the reads are so easy on All-Madden and Heisman difficulty levels, why do teams have such big problems moving the ball?  The reason is we only get really basic reads in the video games; if all quarterbacks had to deal with were vanilla undisguised defense like we are seeing, they'd shred the defense too.

The big factors that make life harder for real quarterbacks that we do not need to deal with are adjustments by individual players and special blitz schemes that defensive coordinators install.  Defenses know what offenses are looking for, and both coaches and players are constantly feeding the offense bad information to make reads from.  

Individual Player Adjustments


Two clips of analysis from the Denver - San Diego playoff previews make this point well.  First, Trent Dilfer on NFL Primetime talks about how Chargers Free Safety Eric Weddle allows the San Diego defense to present quarterbacks like Peyton Manning with difficult pre-snap reads by moving all over the field.  Smart players like Weddle change the defense on the fly because they understand the scheme:
Making a freelance decision like that works only when Weddle understands that his choice won’t affect the other parts of the defense. Pagano says that his favorite Weddle moments are in their conversations on the sideline following a given series. Weddle is able to not only describe what he’s seeing, but also to give Pagano the in-game end zone view of the entire defense. If a lineman is out of a gap, or a certain run fit isn’t working, Pagano knows before the photos from the game film are even processed.


Disguised Defenses


The other thing that messes up the offense is when the defense rushes from directions that aren't obvious from the alignment or when they show blitz but don't.  Blockers can make mistakes and leave unaccounted for rushers and quarterbacks can be fooled into thinking a covered passing lane is open.  There are very few of these types of defenses in Madden and NCAA, the AI rarely calls them, and there are only so many of them to look for.

Here we have a clip by Ron Jaworski on Sunday NFL Countdown going through examples of the disguised coverages used by the Chargers.


Although Madden and NCAA make it feel like it is "easy" to make a read and move the ball, it really is not so simple in real football.  Maybe the Detroit Lions do indeed suck... but it's not just them being the "Same old Lions" - the other teams (not just the defenses) are pretty good at what they do.

Saturday, February 22, 2014

Smash Part 3 of 3: Cover 3 and Cover 4

So far with the Smash play, we have a read against two high safeties that can go down the middle with the TE Divide route against zone and to the backside Dig against Man coverage.  When we get a single high safety, we can throw the backside Dig against Man coverage and possibly get a big play because the cornerback will be isolated against the WR.  But what do we do against single high if the defense is not in Man coverage?  Furthermore, what if they are in a four across deep coverage look?

This is where the hitch at the front of the Smash combination comes into play.  The cornerback opposite the frontside wide receiver in either a single or four high look will almost always be playing loose and line up pretty far back from the line of scrimmage.  If the CB is all the way up in the WR's face, that will almost always be press man, and we're fine.  The quick hitch takes advantage of the fact that nobody is near enough to the WR when he stops to make a difference, and we end up picking up five yards for no effort.

Cover 3


Consider the following alignment in NCAA with a Smash playcall against a single high safety:


First notice how far back the corner on the right is.  The next cover man over the slot will be forced to drop with the slot receiver down the seam, and cannot take the hitch.  Similarly, the inside zone defenders are forced to honor the TE streaking down the middle of the field, so they cannot take the hitch either.  If it were coded better, I would think the defense ought to be adjusting to get the linebackers to rotate over, but instead NCAA and Madden do weird things like this:


The corners and slot defender drop into deep coverage and the free safety rotates over under the backside Dig.  This leaves an extra man on the backside, so one of them must book it across the field to get to the uncovered far right zone.  There is no way for him to make it over in time; our receiver is wide open and the throw is on the way before he even clears the tackle box.


Since this is not a blitz situation and the receiver is uncontested, this is an automatic completion with enough running room to get a few extra yards every time.

Cover 4


The very next play, Florida State lines up with two high safeties and corners back.  Again, the important thing to see out of the alignment is the big cushion the hitch receiver starts out with:


The trips right overloading of the coverage scheme crosses up the underneath zone defenders in Cover 4 as well.  The slot defender is forced to carry the slot corner route's stem a bit up the field, leaving the hitch uncovered.  The linebacker nearest the TE does the same, and is forced to carry him up the field.  This leaves only one defender on the wrong side of the formation to try and get over to cover the hitch, which is not going to happen.


As before against Cover 3, the hitch is wide open against Cover 4. Both defensive calls are strong against plays attacking deep, which necessarily leaves the coverage scheme vulnerable against a quick hitter.


Here are the two plays back to back:


Madden 25 Example


Although those clips above are from NCAA, this read to throw the Hitch works largely the same way in Madden.  At about the 1:35 mark, there's an interesting decision I don't remember making.  Instead of throwing the Dig against man coverage, I went to the Hitch to get a short first down.  This is normally okay, but look how the cornerback charges the Hitch in man coverage.  This can be a dangerous throw to make: if there is an All-Pro CB there, it can be a pick six going the other way.


As a general rule look at the linebackers when you suspect Cover 3 or 4 is likely, and read whether as a group they are indicating man (throw the Dig) or zone (throw the Hitch).

Monday, February 17, 2014

Smash Part 2 of 3: Backside Dig versus Man Coverage

The Smash play works well against most defenses that start from a two high safety formation, but it does not do very well against schemes like 2 Man Under that have man to man coverage.  Since the play is attacking the empty seams between the deep halves and between the deep strong and shallow strong half, the quarterback is waiting for receivers to run away from the nearest defenders; man coverage keeps a guy close to everyone in the pattern.

Go back to the concept of pairing coverage beaters and look at the other side of the field.  Similar to the Stick play with its backside slant to beat man coverage, we have a route specifically placed on the weak side of the field designed to beat man coverage that reduces the effectiveness of the frontside Smash Divide.  From Shakin the Southland:

We will start with a simple route and a simple coverage, the 10 yard dig route against a man defense. A dig is commonly referred to as a "square in". Notice it is a SQUARE in, not a rounded in. For this particular pattern, the receiver will run 10 yards, turn and run laterally towards the middle of the field. What the receiver will want to do is get off the ball quickly and drive towards the defender’s outside or bounty-side shoulder. The receiver essentially has 10 yards to sell the defender that he will be going vertically down the sideline, hence the importance of getting off the LOS quickly with explosion to get to shorten the corner‘s cushion as quickly as possible. The receiver will push the corner as hard as he can for 8-9 yards, hopefully getting the defensive back to open his hips as though he were defending a fade route. It is important to remember that the key to placing the defender in a bad position is to get the defender to open his hips in the opposite direction of the route’s design. If the defender is this far out of position, the receiver should be open every time, particularly against man coverage. Note, the receiver may wish to utilize a technique called stemming where the receiver will run his route slightly towards the boundary to make the defender believe that he is indeed trying to get to the outside, thus opening the defender‘s hips towards the opposite direction of the actual route. 
At 8-9 yards the receiver will wish to breakdown (breaking down is a common term for chopping one’s feet rapidly to slow down) so that he can make his cut (or break) at 10 yards. When the receiver breaks down, he will need to maintain complete control of his body. Hence, the receiver will want to lower his center of gravity as he approaches the cut. You will notice when watching good receivers run routes, they almost look like they are squatting down as they approach their break. At exactly 10 yards--or the exact route designed depth, the receiver should be completely under control and have the ability to plant his outside foot. He will use this foot to completely change his direction and cross the field PARALLEL to the hash marks. Since the receiver has maintained a low center of gravity, is completely under control, and has securely planted his outside foot, he should be able to accelerate out of this break free of the cornerback who is playing man defense against him.
This "10 yard dig" is what we have on the backside of Smash in Ace Y-Trips, actually breaking at about 12 yards rather than 10:


Reading the underneath linebacker in front of the tight end gives away the coverage.  If we have someone locked up on the TE as he pushes down the field, the place to look is the backside Dig.

The Isolation Play


As in the Smash play, we take advantage of the fact that putting the slot receiver on the right side leaves the lone wideout on the left side by himself.  That is why the man beater is so effective on the backside: unless the defense wants to give us a numbers advantage on our overloaded strong side, the weak side is an isolation situation with our WR one on one with the CB.  Smash is not designed to go to the isolation play, but it is there when we need it.

Here are three examples of throwing the backside Dig route against man coverage.  The three plays shown are against Cover 0, Cover 1, and 2 Man Under:


As with the Curls play, the sudden stop of the receiver is what gets the separation.  The Dig route has a higher chance of springing a big play as the receiver is already moving as he catches the ball, but takes a little longer to develop and is vulnerable to certain blitzes that Curls is not; you may get sacked if the weak side is way overloaded before the quarterback can get rid of the ball.  Although it is rare, it can happen even if your offensive line is excellent; sometimes changing the play against such blitzes is a better idea than trying for the big play.

The action we're looking for in the one on one matchup is this:


Notice how the quarterback reaches the end of his five step drop at the same time the wide receiver is about to go into his break.  The timing of the route and the drop are lined up so the throw is delivered exactly on time by watching the receiver and throwing based on his move to the inside.

A Note About Personnel


Previously, I said that one reason to want our best receiver in the slot from Ace Y-Trips is so we get a potential mismatch on the post route in Curls.  That mismatch could allow an attack down the middle of the field against a two shell.  Now that we have a better play to attack a two shell and a way to audible away from Curls when we see the two high safety look, it is a much better idea to put the number one on the far left side of the formation.

Most of the pass plays we are running from this formation are attacking the strong side with three receivers to scheme someone open against zone coverage.  When the defense is likely in man coverage, the check to the weak side in every one of these plays is a backside man beater: the Curl on an island in Curls, a quick Slant in Stick, and now an intermediate Dig in Smash.

This makes putting the best receiver out there using personnel groupings from the playcall screen a good move.  In NCAA, this is the WR Switch package substitution:


In Madden 25 using the Detroit Lions offense, the package substitution is called Strong Solo:


This puts your #1 wide receiver as the isolation matchup on the left side and your second and third receivers on the right side.  Remember that the quality of the WR on the right side in Curls is not that important since most of the catches he has to make will be uncontested.  This will also be true when we throw to him in Smash (getting to that part in the next post).

Why is it better to put your best guy out there by himself?  Because winning this matchup against a blitz could mean a touchdown from anywhere on the field:


Saturday, February 15, 2014

Smash Part 1 of 3: Attacking the Two Shell

We've seen that one way to beat Cover 2 is to audible to a quick hitting play like Stick.  This is good for short gains, but is unreliable for gaining more than 5 or 6 yards.  If the options for the defense is to go to a Cover 3 or Man look and sacrifice big yards versus Curls or keep calling defenses with two high safeties, you might see two high all day.


This is where the Smash play comes in; this is a play that is specifically designed to hit alignments with deep safeties playing halves.  The play is weak against Cover 3, but does very well against most Man coverages behind blitzes and is okay against Cover 4.  Hitting Cover 2 for big yards forces the defense to call more Cover 3, which is exactly what we want to throw Curls against.  Either way, we have a good chance of getting the coverage matchup we want and can simply audible to a run or Stick if we don't get what we want.

How the Smash Combo is Supposed to Work


The Smash route combination is the pairing you see on the far right of the play diagram.  Here's Florida State's Jimbo Fisher on "the universal route that is good versus any coverage":
One of these routes is the smash route. The smash route is basically a two-man route. It consists of the outside offensive player running a 5-to 6-yard hitch route and the inside offensive player running an eight step or 12 yard smash route. We call this a smash route because the route, will be read at the break point.
The idea is to get a vertical stretch on the defender in the underneath zone along the right edge of the formation.  The quarterback will key the cornerback to determine where to go with the football. Based on the reaction of the cornerback the QB will know whether to throw the corner route (high) or the hitch route (low).  If the underneath zone defender (usually the cornerback) takes away the hitch, he has to come up and play the WR very close to the line, taking him out of position to intercept against the corner route behind him:


When the defender plays the short route, "the goal is to hit in the window behind the corner but in front of the safety."  If the zone defender plays back, he takes away that corner route, but is out of position to cover the hitch:


No matter which way the underneath zone defender flows, one of the two routes is supposed to be open because they are attacking the top and bottom edges of the same zone guarded by one defender who cannot cover both of them simultaneously.

Why We Don't Make This Read


In NCAA 14, there are two main reasons not to read the Smash play this way to attack the trips side cornerback.  The first is the camera angle in the game.  If you are on the left hashmark, it is hard to see what is going on over there.  Since this play is best run from the left side of the field, we have a problem:


The second reason to not read this play as a normal Smash combo is that the slot receiver running the corner does not break early enough or bend the route flat enough to be effective.  In the picture above, you can see the stem of the slot man's corner route is actually very long, and extends all the way up into the alley between the deep zones and underneath zones.  That is actually too late, and he needs to be able to flatten off the break to attack the hole along the sideline.  

Consider the following Smash play:


Here the throw to the corner is wide open.  The safety is playing far back and the cornerback is sitting shallow on top of the 5 yard hitch.  This is exactly the Smash read to throw the corner in front of the safety.  Instead of breaking to the open area for the QB to drop the ball in to him, the slot man runs too deep up the field and hardly breaks, running straight at the safety:


Players in NCAA Football will not make the kinds of adjustments a real player would make on the field.  Go back to what Jimbo Fisher said about the Smash combo:
We call this a smash route because the route, will be read at the break point. (See Diagram 1) 

The smash route is a versatile route good vs. all coverages. The inside receiver is the one who does the reading. Versus zone coverage, he reads the corners depth. There are other variables of the defense that can be read also, but by reading the corner, this is the simplest way and it eliminates complicating the procedure.
Since our slot receiver running the corner on top of the Smash combo won't make this read correctly, it messes up the way the routes are supposed to work together.  Fortunately, the play is still effective even if the vertical stretch is broken because there is a great horizontal stretch element.

Smash Divide


When reading two high safeties, the important routes are not the corner plus hitch: it is the corner plus the TE vertical down the seam.  Our Smash play from Ace Y-Trips is really the Smash Divide play covered by Chris Brown at Smart Football:
The point of this article is to talk about adding a bit more of a big-play dimension to theSmash by using the "divide route," which in other coaches terminology may be a "seam read" or a "tube-read." Both the route and the "read" are simple. 
The divide route involves a MOFO or MOFC read by the inside receiver. MOFO simply means "middle of the field open," or no deep middle safety. MOFC means "middle of the field closed," or is there a deep middle guy. The nice thing about this read for the "divide route" as opposed to some other contexts is that the route, hence the name, is simply about "dividing" the deep coverage and the receiver has a lot of freedom to find the downfield open grass. It's a deep stretch and it is designed to strike safeties who overplay the smash or simply get out of position. 
Obviously the immediate strength of the divide route as shown is that if a two-deep safety to the smash side overplays the route, one can hit the post route for a big play. If you keep the go route on the backside (as diagrammed) and both safeties overplay the Smash side then the "Go" might be open for a big play. The simple reality is that a Cover 2 team really cannot cover this concept effectively.
 Now look at the diagram that he uses to accompany the article, showing the concept against Cover 2:


The trips side on the right is remarkably similar to the routes assigned to our Smash play from Ace Y-Trips:


In fact, it turns out the TE in our play is programmed to make that divide route read that Brown mentions.  The TE runs down the Cover 3 seam and angles slightly away from the strong half safety into the middle of the field.  The reason everything works here is that the weakside WR is threatening with a vertical stem, breaking in front of where the weak half safety is sitting, and he has to honor the possibility that we might get a deep play there.

So the weak half safety is pinned by the weak side dig route and the strong half safety is pinned by the slot corner route.  This leaves the TE streaking down the middle with nobody to pick him up.  He will be one on one with whoever is playing the middle underneath - typically a linebacker - who is counting on over the top help from a safety, and will pass the TE once he crosses over into the deep part of the field... except nobody will pick him up.  This is what a Tampa 2 defense is supposed to be taking away:


Kiffin and Dungy schemed to drop their middle linebacker straight down the middle of the field ("the pipe") to take away the soft zone in the deep middle of the field and allow the safeties to get to the deep sideline more easily. They dropped their corners off the line of scrimmage more than the usual Cover-2 alignment. That allowed them to disguise coverage, roll defenders to protect zones during the rare blitz and keep blockers off the corners on rush downs. 
To pull it off, they needed players with very specific skill sets. They needed explosive edge rushers who could get to the quarterback, run defense was secondary. They needed a special MLB who was stout enough to play the usual run support role but athletic enough to drop in coverage and make plays.
Most of the time, a defense will not have a MLB capable of covering the TE one on one with no help.  In NCAA especially, the strong half safety will overcommit to taking away the corner (another reason we can't make the real Smash read), so you get the big play down the pipe very often.  Instead of a vertical stretch against the strong side cornerback, we are now attacking the strong half deep safety horizontally.

Throwing the TE Divide


When the defense in a two high safety look, the place to watch is right in front of the TE.  What we are trying to determine is if the defense is in zone or man coverage - just like when we were throwing the Stick.  If the linebacker turns and runs with the TE down the field with his back to the quarterback, we know we have him in man coverage.  If the linebacker does not turn around and instead backpedals, he is in zone.  

Here is an example of the TE divide route against Cover 2 Sink and Cover 3 Cloud calls out of a two high shell.  Notice the linebackers move backwards and laterally to get to their zone assignments.  The quarterback has to start his delivery as the TE is running past the backpedaling underneath linebacker.  This ensures the TE cannot be caught by the LB, who must now turn around to try and catch a guy running already blowing by at full speed.


On this play versus Cover 2, watch the strong deep half safety.  He stays over the top of the corner route until the throw is on the way, leaving more space in the middle of the field for the TE to work:


The other possibility is the linebacker could be blitzing, in which case he is creating a hole in the coverage we can hit very quickly for an easy completion.  Here is Cincinnati playing Cover 2 Blitz and Under Smoke 2 (twice).  As long as the protection can pick up the blitz and give enough time to make the throw, hitting the TE in a coverage hole is very easy.  On the first play you can really see the corner route holding the strong side safety away from the TE (and again we wait until he is running by the backpedaling LB) while on the second and third plays the underneath zone hole is obvious at the snap.


While you can sometimes throw the divide against man coverage, it is risky.  The principle is similar in that the QB needs to wait for the TE to get separation into the deep middle of the field.  The difference is that instead of running past a linebacker who needs to turn around, the quarterback is waiting for the TE to outrun the man defender and needs to drop it in from above.


The danger is that the route takes longer to develop since the linebacker is running with the TE and the throw itself takes longer.  The higher arc of a ball coming in from above gives the safeties more time to react and get over to make a play; this is usually a bad throw to make against teams with very good safeties.

Throwing the Slot Corner


The difference between running this play in NCAA and in Madden is that in Madden the slot receiver will break his corner route much flatter than in NCAA.  This makes it possible to consider throwing the slot corner against Cover 2 as designed.


The thing to focus on in both clips in the video above is how close to the sideline the slot receiver ends up. Unlike the slot corner route in NCAA, the Madden slot corner route gets run way to the outside; this gets the slot receiver out of the inner underneath zone faster because he's not just getting distance from the defender vertically but also horizontally.  This is more obvious in the first of the two plays: the zone defender stops around the numbers at the edge of his assigned zone.

In NCAA, the only time the slot corner route is likely to be open is when the slot receiver is uncovered.  This is like throwing the slot post in the Curls play - opportunity is not often there, but we have to be alert and watch for it.

Wednesday, February 5, 2014

Stick Part 2 of 2: In-Game Reads

From the Ace Y-Trips formation, the Stick play is the go-to audible if you need to get medium yardage.  It is a reliable play for picking up 4 to 6 yards with the possibility of hitting a 10 to 15 yard slant on the backside.  The process for using the play in our offense is:
  1. If you see two high safeties and corners up, pre-snap read is Cover 2 of some kind.  If you have a bad play against Cover 2 called, check out.
  2. If the TE has a man playing directly over him appearing to match up in man coverage, read the coverage on the TE in case it is in fact man to man.  
  3. If the linebacker or safety nearest the TE backs away from him rapidly in any direction and nobody is flying in to pick him up, post-snap read is zone and wait for the TE to settle in the hole.  Anticipate the TE turning for the ball and throw as he plants to change speed.
  4. If the TE is covered tightly by an assigned man coverage defender, see if the TE breaks to the outside and gets a lead on a slow linebacker.  If so, you can throw the out since the edge defender further outside ought to be concentrating on the slot receiver running a predesigned out route to hold him.
  5. If the TE is covered tightly by an assigned man coverage defender and cannot get separation, go to the backside slant.  Watch your receiver to see when he gets a release because he should break almost immediately on the slant if he is not stumbling.  The throw should be started as soon as it looks like the receiver is aware, steady, and able to break into his route - the quarterback will anticipate the slant route's comeback toward the middle of the field and lead the receiver.

The TE Read: Zone


The most important element of reading the play is knowing which defender we are picking on. When you watch the cut ups of Stick audibles above against Central Florida, pay attention to the linebacker to the inside (left) of the TE.  The nearest linebacker retreating deeper into the middle of the defense is a dead giveaway that we have zone coverage - they are all dropping into assigned underneath zones.

At that point, the only issue is the defensive back over the slot receiver, but the route combination on the trips side is designed to drag the coverage away from the Stick.  The slot man is pulling the zone defender between the right hash and right numbers to the outside and the WR to the far right of the formation is pulling the furthest outside zone defender with him deep.  That leaves the TE working against only the zone defender to his inside, which is why his option route is to plant and cut to the outside away from that defender.

For an example of this, see the first play in the video below:


In most cases, you should see the TE settle in a huge hole with nobody around him with a basketball post up move (The second and last plays in the video).  That's when we need to hit him for free yardage.  This is a great option on first or second down because against any zone scheme this almost guarantees you will face a third and 4 or 5 yards to go type situation at worst.


The TE Read: Man


When the TE breaks to the outside, it's possible he will be open even if there is man coverage assigned to him.  Since he draws linebacker coverage, it depends on how bad that linebacker's cover skills are.  The second play in the video below shows an instance of when the cut to the outside gets the TE open:


The only reason this works is the linebacker starts in awful position to the inside, is slower than the TE, and most likely has bad cover skills/recognition:


Patience on the Backside Slant


Faced with man coverage on the TE, it is almost always better to simply abandon the stick option and throw the slant since it is designed to beat man schemes.  Most of the defense is on the trips side and the conditions for the audible to Stick means there are two high safeties: this leaves little help inside or underneath for the backside cornerback.  If the wide receiver has enough time to work, he will get open.


If held up at the line by good press coverage, it is not immediately clear how the wide receiver will release. He might get an outside release and do a stutter step to get back inside as above, or he might get a swim release to the outside and cut to the inside behind the cornerback. The outside release is more common:


It is possible the receiver will get an inside release, sometimes because he gets shoved and thrown off balance by the corner.  Since there is nobody in the middle of the field underneath, the shove actually gets the receiver open if the quarterback is able to wait long enough for him to recover his balance and look for the ball (see the second play below):

Saturday, February 1, 2014

Stick Part 1 of 2: The Curls Companion

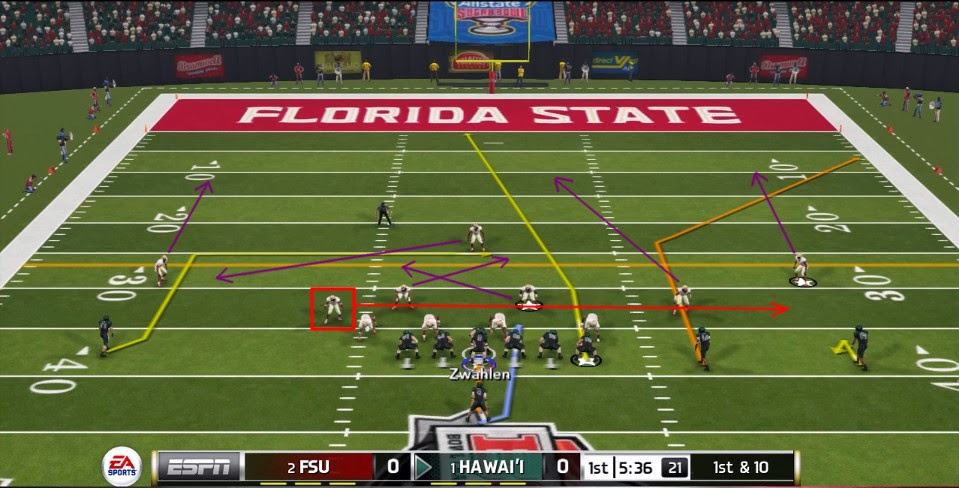
In the breakdown of how we use Curls, it was pointed out that you can stay with the Curls play against a defense with two high safeties if you trust your slot receiver to beat his man on the post.  Against any Cover 2 shell, the slot post is a matchup throw that can get big yards, but it is risky and inconsistent.  If the slot receiver doesn't win his matchup or the defense has good safety play that recognizes where the quarterback is going with the ball, there are few options left: both curls will be likely be covered close, and defenders will swarm quickly to the flat.  It is generally better to check to a run or a pass play better suited to dealing with Cover 2 (zone or man).

A pass play we can check to against a two shell is Stick.


This is a staple concept in the Air Mumme/Mike Leach/Dana Holgorsen Air Raid offense, and is designed to have a vertical stretch similar to a Smash combination paired with a horizontal stretch that stresses the defender playing underneath.  Smart Football has an excellent writeup of how the horizontal and vertical stretches are applied:
The best vertical or horizontal stretches use more than two receivers, with three or more receivers being used in various “zone flood” routes. If you caught the defense in the right look it was mathematically impossible for them to defend you: If you ran the three-level flood route against Cover 2, they had two guys (a corner and a safety) to defend three receivers; and if you caught a Cover 3/4-under defense with your all-curl concept, it was easy pick’ins
That's what we're talking about with Curls versus single high (Cover 3) or four across (Cover 4).  The issue we had with Curls is that we don't have an answer to Cover 2.
Enter the triangle stretch. The insight behind the triangle is that the horizontal and the vertical stretch are combined to create a single straightforward read for the quarterback that provides answers no matter what the defense presents. 
All of the major “new” (in relative terms) passing concepts are based on a triangle read. The weakness of the triangle stretch is that it’s typically only possible to only get a two-man horizontal or vertical stretch, whereas with a true “flood” you can place three (or more) receivers across the field on a given plane to truly defeat a defense. This limitation means that a triangle can be throttled by certain coverages that rotate to the triangle side. 
But all this is counterbalanced by the triangle’s versatility: the route concept should result in a completion against almost any coverage, and, as will be shown further below, triangle stretches are also usually conducive to having a man-beating concept within them. And if the defense does roll to the triangle side, some kind of backside combination of passes or runs can be used to keep the defense honest. Indeed, the two most popular “triangle” stretches are the “snag” and the “stick” concepts, which are universally used as both ball-control zone beaters and blitz-man beaters. There’s a reason why they have quickly become maybe the most popular pass concepts in football given the simplicity of the throws and the ability to package these concepts with various backside combinations.
The play, also commonly known as Y-Stick, can be run as a three step or five step concept.  We run it purely as a three step quick pass concept and in fact never send this in as the initial playcall.  In the context of this offense, we use it only as an audible as a response to a two shell pre-snap look by the defense in Ace Y-Trips and are not trying to set anything else up with it.

Going to this play as an audible is very easy because it is the default "quick pass" that both NCAA and Madden set as the "right stick up" play in the formation (Press X to instruct the game to audible, then push right analog stick up to get the quick pass defaulted to the formation - which is Stick for Ace Y-Trips).

Posting Up


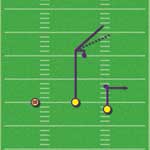
The way the play is designed to work is that you pair a vertical route and a quick out so there is one receiver deep and one receiver short - that's your vertical stretch via two guys along the sideline.  Now add a third receiver also short but closer inside by the near hashmark - that's your horizontal stretch via two guys short to the same side of the field.  Consider this picture of a Stick play from a Grantland article by Chris Brown on Oklahoma State using it in its 2012 Fiesta Bowl win:


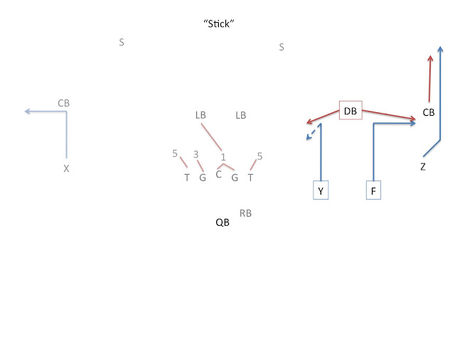
This is a mirror of our play diagram at the top: vertical run by the left WR, the slot runs a quick out, and the next guy in runs a short hitch.  On the backside of the play, the lone WR runs a slant.  The effect of the two stretches on the defense can be better seen in this diagram from Dawgs by Nature:


For the most part in both Madden and NCAA, the underneath defender labeled DB in that diagram almost always opts to cover the flat because he has help inside but is the last man who can stop the route breaking to the outside.  That leaves the Y receiver to be covered by a linebacker who is usually out of position.

The primary receiver in the playart in Madden and NCAA is correctly identified as the TE, who is playing the part of the Y receiver.  Tight Ends in the past were hard to find because so many athletes with the necessary body types would go play basketball as power forwards.  


In the Stick play, that's exactly what we want our Power Forward to do: post up and get the ball in the lane.  Watch the Y receiver in these Stick plays from a Saints-Patriots preseason game.  They run down the field, stop and turn and put their hands up for the ball.  In particular, watch the second play where Brian Hoyer throws the out to Shane Vereen instead of the stick to Alex Silvestro: the TE still brings his hands up and is ready to catch the ball whether it is coming or not.


Of course, the Saints also run the stick concept:


Stealing Yards


The read we use is the same as on the Live to Win blog for the Stick play out of a 3x1 set:
Our Progression: (With Access CLOSED)
Z: is a pre-snap read only. Z is out of the equation unless we see two things: Man Coverage or Cover 2 with a big window.
Y to H: The rule is simple; the ball automatically goes to the Y unless color covers the route. Color = H on the speed out.
The goal is to out-leverage the invert or force defender with a horizontal read and make him wrong.

The reason Chris Brown says the three man stick concept to the strong side "is good against almost all zone coverages" is because the TE will post up in front of the linebacker.  As long as the man over the slot runs with him to the flat (and he always will), the TE will be up against a linebacker who will do one of two things.

If the linebacker is in zone coverage, he will start flowing or backpedaling into his zone once he diagnoses "Pass."  That means he is already moving away from the TE, and "off coverage isn't going to do much against a well run stick."  Like our Curls routes getting separation by stopping suddenly in front of zone cover men backing away from them, the TE will settle into the seam between the LB in the inside zone and the defensive back being dragged outside by the slot receiver's quick out: the out is designed to widen the seam.

If the linebacker is in man coverage, he will run to the TE once he diagnoses "Pass."  That can be bad because either the TE will get blown up and possibly drop the ball or the LB might even step in front and intercept the pass if he's close enough.  That's why the Stick play has the TE's route shown as an option route that most times will look like a quick stopping comeback route, but leaves an option to also turn it into a quick out:


As in the Mike Leach Texas Tech version of the Y-Stick play, this allows the TE to work with the space bought by the slot receiver's quick out to find a way to get open:

Now, as you can see, the Y-receiver, who for Texas Tech this year will be Jace Amaro, is the second read in the quarterback's progression but he's usually the player that will get the ball. This is due to the fact that there is a hole in the zone defense created by the running backs route to the flats. The safety, nickel or strongside linebacker will, usually, have to choose to cover either the tailback in the flats or the Y-receiver, and, traditionally, will pick the flats. That leaves a hole for the Y to shuffle outside and catch the ball while facing the quarterback. Against man coverage, the Y receiver will run the stick again, but he'll usually cut in a much more vicious fashion to get a good release of the defensive back, pivot inside and wait for the ball.
This is considered a high-percentage play because it's usually an easy throw that will move the ball forward no matter what defense you might be facing.
The option to also run a quick out makes it possible to throw the stick against just about everything, but that doesn't make it a good idea.  Again, simple throws to very open receivers is the best way to compensate for a low talent roster.  Good talent makes other things possible, but better players can still do the same things worse players are able to do successfully.  Throwing the TE against man coverage is relying on the TE to make a good read and take the option route to cut outside and then beat his man.  A couple of things can go wrong here - the TE might not read the defense right and make the quick out, the TE might not be a good enough route runner to get open, or the LB could be a superstar or lined up in a great position that closes the distance too fast and he makes a great play on the ball.

The Backside Man Beater


Let's go back to the first picture we had of Oklahoma State running Y-Stick in the 2012 Fiesta Bowl.   Brown points out that Justin Blackmon is running a standard man beater slant concept on the backside:
To Blackmon’s side, the Cowboys ran a simple “slant/flat” combination, where Blackmon runs a slant while the runner runs a route to the sideline to control the flat defenders. This route is good against some zone coverages as well, but it’s primarily here for man-to-man: If Stanford tries to single out Blackmon, that’s where Weeden is going with the ball, and that was what they did.
While we lack the accompanying flat route from the back, we also have a slant on the backside, which is a great man beater.  This goes with our philosophy of packaging coverage beaters to ensure the quarterback has a good place to go with the ball no matter what the defense is doing.  

At the snap of the ball, we stare at the TE stick and check to see what the LB is doing.  If the LB jumps the route, that tells us immediately we are facing man coverage.  Instantly, we should look at the slant.  Since we are only ever checking into this play against a two high look with corners rolled up on the line in our wide receivers' faces, the LB telegraphing man means we can expect to see our WR getting press coverage on the outside.

This is a good matchup because the cornerback playing press coverage is counting on the blitz to get to the quarterback while his bump at the line throws off any timing the offense is counting on.  The problem is that we aren't trying to time this particular route, and it is already the kind of route you would throw hot against a blitz.  All we do in this situation is wait for the receiver to come off the press (he will eventually), and immediately break to the inside after getting a step past the cornerback.  It's when he makes his break and the corner doesn't know which way the WR is going to run that we make the throw.  The receiver will plant and drive to the inside, running to where the quarterback is delivering the ball.  Against man coverage behind a blitz, this is generally good for 10-12 yards and almost always a wide open throw.

Here is Sir Charles on what happens when you hit the TE on the stick enough times against zone coverage:


This is what makes the Curls/Stick/Dive combination so nasty - each component opens up the other parts of the scheme.  Pretty soon you start to see the defense playing a ton of 2 Man Under trying to shut the TE stick down, but then you can start to run the ball or throw the slant on the backside.  If they start calling single high man coverages to stop the slant or try to drop the SS down into the box to play a Cover 3 scheme, that plays into our hands: we never check to Stick to begin with and take the Curls for first downs.